Hadoop家族产品,很多。常用的项目包括Hadoop, Hive, Pig, HBase, Sqoop, Mahout, Zookeeper, Avro, Ambari, Chukwa,YARN, Hcatalog, Oozie, Cassandra, Hama, Whirr, Flume, Bigtop, Crunch, Hue, Spark, Streaming, Kafka, Flink等。对照Hadoop_Ecosystem_Table,我们将其分类为:
三大类:
- 大类1:存储
- 1分布式文件存储系统
- 3 数据库[列存储、文档存储、流存储、KV存储、图数存储]
- 4 新型数据库
- 大类2:计算
- 2 分布式编程
- 5 SQL on Hadoop
- 6 数据处理
- 大类3:算法
- 9 机器学习
- 大类4:其它
- 7 服务系统
- 8 调度系统
- 10 其它[标杆及问答、安全、元数据、系统部署、应用、部署架构等等]
本文的介绍是一个概览,会对以上重要组分别说明与介绍。
Back to Ecosystem_Table
0 Introduction
以下图片为广泛传阅的生态图,较早为2015年,出处不详。

以下图片为最新且常用的生态图,图片源自Safari
 ,是本文主要介绍的部分。
1 Hadoop Core
主要包括HDFS,MapReduce,YARN,HBase.
1.1 HDFS
Hadoop Distributed File System (HDFS™): A distributed file system that provides high-throughput access to application data. HDFS 是一个能够面向大规模数据使用的,可进行扩展的文件存储与传递系统,是一种允许文件通过网络在多台主机上分享的文件系统,可让多机器上的多用户分享文件和存储空间。实际上,通过网络来访问文件的动作,在程序与用户看来,就像是访问本地的磁盘一般。即使系统中有某些节点脱机,整体来说系统仍然可以持续运作而不会有数据损失。
1.1.1 HDFS体系结构(HDFS Architecture)
 The NameNode and DataNode are pieces of software designed to run on commodity machines. These machines typically run a GNU/Linux operating system (OS). HDFS is built using the Java language; any machine that supports Java can run the NameNode or the DataNode software.
1.1.1.1 Namenode
Namenode是整个文件系统的管理节点。它维护着整个文件系统的文件目录树,文件/目录的元信息和每个文件对应的数据块列表, 接收用户的操作请求。
文件目录查看:

文件包括:
- ①fsimage:元数据镜像文件。存储某一时段NameNode内存元数据信息。
- ②edits:操作日志文件。
- ③fstime:保存最近一次checkpoint的时间
以上这些文件是保存在linux的文件系统中。通过hdfs-site.xml的dfs.namenode.name.dir属性进行设置。
1.1.1.2 Datanode
- 提供真实文件数据的存储服务。
- 文件块( block): 最基本的存储单位。
- 对于文件内容而言,一个文件的长度大小是size,那么从文件的0偏移开始,按照固定的大小,顺序对文件进行划分并编号,划分好的每一个块称一个Block。 HDFS默认Block大小是128MB, 因此,一个256MB文件,共有256/128=2个Block.*
- 与普通文件系统不同的是,在 HDFS中,如果一个文件小于一个数据块的大小,并不占用整个数据块存储空间。
- Replication:多复本。默认是三个。通过hdfs-site.xml的dfs.replication属性进行设置。
文件Block查看:

物理存储位置:
[hadoop@NN01 subdir2]$ pwd
/home/hadoop/hadoop2.6/hdfs/data/current/BP-1413666402-192.168.71.128-1470385990339/current/finalized/subdir0/subdir2
[hadoop@NN01 subdir2]$ find . -name "*1073742529*"
./blk_1073742529_1778.meta
./blk_1073742529
1.1.1.3 数据存储: staging
HDFS client上传数据到HDFS时,首先,在本地缓存数据,当数据达到一个block大小时,请求NameNode分配一个block。 NameNode会把block所在的DataNode的地址告诉HDFS client。 HDFS client会直接和DataNode通信,把数据写到DataNode节点一个block文件中。
1.1.1.4 数据存储:读文件操作

- 1.首先调用FileSystem对象的open方法,其实是一个DistributedFileSystem的实例。
- 2.DistributedFileSystem通过rpc获得文件的第一批block的locations,同一个block按照重复数会返回多个locations,这些locations按照hadoop拓扑结构排序,距离客户端近的排在前面。
- 3.前两步会返回一个FSDataInputStream对象,该对象会被封装DFSInputStream对象,DFSInputStream可以方便的管理datanode和namenode数据流。客户端调用read方法,DFSInputStream最会找出离客户端最近的datanode并连接。
- 4.数据从datanode源源不断的流向客户端。
- 5.如果第一块的数据读完了,就会关闭指向第一块的datanode连接,接着读取下一块。这些操作对客户端来说是透明的,客户端的角度看来只是读一个持续不断的流。
- 6.如果第一批block都读完了, DFSInputStream就会去namenode拿下一批block的locations,然后继续读,如果所有的块都读完,这时就会关闭掉所有的流。
[Alert!]如果在读数据的时候, DFSInputStream和datanode的通讯发生异常,就会尝试正在读的block的排序第二近的datanode,并且会记录哪个datanode发生错误,剩余的blocks读的时候就会直接跳过该datanode。 DFSInputStream也会检查block数据校验和,如果发现一个坏的block,就会先报告到namenode节点,然后DFSInputStream在其他的datanode上读该block的镜像。
该设计就是客户端直接连接datanode来检索数据并且namenode来负责为每一个block提供最优的datanode, namenode仅仅处理block location的请求,这些信息都加载在namenode的内存中,hdfs通过datanode集群可以承受大量客户端的并发访问。
1.1.1.5 数据存储:写文件操作

- 1.客户端通过调用DistributedFileSystem的create方法创建新文件。
- 2.DistributedFileSystem通过RPC调用namenode去创建一个没有blocks关联的新文件,创建前, namenode会做各种校验,比如文件是否存在,客户端有无权限去创建等。如果校验通过, namenode就会记录下新文件,否则就会抛出IO异常。
- 3.前两步结束后,会返回FSDataOutputStream的对象,与读文件的时候相似, FSDataOutputStream被封装成DFSOutputStream。DFSOutputStream可以协调namenode和datanode。客户端开始写数据到DFSOutputStream,DFSOutputStream会把数据切成一个个小的packet,然后排成队列data quene。
- 4.DataStreamer会去处理接受data quene,它先询问namenode这个新的block最适合存储的在哪几个datanode里(比如重复数是3,那么就找到3个最适合的datanode),把他们排成一个pipeline。DataStreamer把packet按队列输出到管道的第一个datanode中,第一个datanode又把packet输出到第二个datanode中,以此类推。
- 5.DFSOutputStream还有一个对列叫ack quene,也是由packet组成,等待datanode的收到响应,当pipeline中的所有datanode都表示已经收到的时候,这时akc quene才会把对应的packet包移除掉。
如果在写的过程中某个datanode发生错误,会采取以下几步:
- 1) pipeline被关闭掉
- 2)为了防止防止丢包ack quene里的packet会同步到data quene里
- 3)把产生错误的datanode上当前在写但未完成的block删掉
- 4)block剩下的部分被写到剩下的两个正常的datanode中
-
5)namenode找到另外的datanode去创建这个块的复制。当然,这些操作对客户端来说是无感知的
- 6.客户端完成写数据后调用close方法关闭写入流
- 7.DataStreamer把剩余得包都刷到pipeline里,然后等待ack信息,收到最后一个ack后,通知datanode把文件标视为已完成。
注意:客户端执行write操作后,写完的block才是可见的,正在写的block对客户端是不可见的,只有调用sync方法,客户端才确保该文件的写操作已经全部完成,当客户端调用close方法时,会默认调用sync方法。是否需要手动调用取决你根据程序需要在数据健壮性和吞吐率之间的权衡。
1.1.2 HDFS常用命令
1.1.3 HDFS问题
文件存储与分发
- 问:存储文件数与位置?
- 答:存储文件数按完整文件个数来讲,是根据dfs.replication来设置的,默认为3份。按照Block来讲,根据文件原始大小来决定Block数(默认Block大小是128MB)。存储位置分配:存储:不同BlockID被随机分配在各个节点上,分发:相同的BlockID会在不同于自身节点上进行复制备份。参看DataNode部分的介绍,图中所示的文件soc-LiveJournal.txt大小为1个G,被拆分为8个Block。同一BlockID被随机地分配在2个DataNode上(注:本集群设置dfs.replication为2)。文件读取时采取就近原则(本地>同网段>跨网段)读取。
1.2 MapReduce
1.2.1 Explain Map/Reduce in 5 minutes
原文链接: http://www.csdn.net/article/2013-01-07/2813477-confused-about-mapreduce by Aurelien.
1 Map/Reduce 有3个阶段 : Map/Shuffle/Reduce
Shuffle部分由Hadoop的自动完成,我们只需要实现Map和Reduce部分。
2 Map部分的输入

图上的城市名称作为key值,所属州以及城市均温为key的value值。ps: 请自动脑补python的dict, jason.
3 Map部分的输出

图上显示的Map部分的输出是根据最终我们想要的结果来实现的。我们要得到每个州的平均值,所以根据每个州来进行新的key/value设计。
4 Shuffle部分

Now, the shuffle task will run on the output of the Map task. It is going to group all the values by Key, and you’ll get a List
5 Rduce部分
Reduce部分的输入为以上Shuffle部分的输出。
Reduce任务是数据逻辑的最终完成者,in our case当然就是计算各州的平均温度。最终结果如下:

6 总结
Map/Reduce的并行执行过程:
Mapper<K1,V1> ==》 <K2,V2>
Reducer<K2,List
PS: You can find the java code for this example here:
https://github.com/jsoftbiz/mapreduce_1
1.2.2 实例演示
1.2.2.1 演示WordCount
[hadoop@NN01 ~]$ hdfs dfs -cat /words/input/file1.txt
Hello World
[hadoop@NN01 ~]$ hdfs dfs -cat /words/input/file2.txt
Hello Hadoop
[hadoop@NN01 ~]$ hdfs dfs -cat /words/input/duplicate.txt
2
8
8
3
2
3
5
3
0
2
7
[hadoop@NN01 ~]$ hdfs dfs -cat /words/output2/part-r-00000
0	1
2	3
3	3
5	1
7	1
8	2
Hadoop	1
Hello	2
World	1
[hadoop@NN01 words]$ hadoop jar wc.jar WordCount /words/input/ /words/output2
16/09/11 21:48:27 INFO client.RMProxy: Connecting to ResourceManager at NN01.HadoopVM/192.168.71.128:8032
16/09/11 21:48:29 WARN mapreduce.JobResourceUploader: Hadoop command-line option parsing not performed. Implement the Tool interface and execute your application with ToolRunner to remedy this.
16/09/11 21:48:31 INFO input.FileInputFormat: Total input paths to process : 3
16/09/11 21:48:32 INFO mapreduce.JobSubmitter: number of splits:3
16/09/11 21:48:32 INFO mapreduce.JobSubmitter: Submitting tokens for job: job_1473644272824_0001
16/09/11 21:48:33 INFO impl.YarnClientImpl: Submitted application application_1473644272824_0001
16/09/11 21:48:34 INFO mapreduce.Job: The url to track the job: http://NN01.HadoopVM:8088/proxy/application_1473644272824_0001/
16/09/11 21:48:34 INFO mapreduce.Job: Running job: job_1473644272824_0001
16/09/11 21:48:46 INFO mapreduce.Job: Job job_1473644272824_0001 running in uber mode : false
16/09/11 21:48:46 INFO mapreduce.Job:  map 0% reduce 0%
16/09/11 21:48:56 INFO mapreduce.Job:  map 100% reduce 0%
16/09/11 21:49:27 INFO mapreduce.Job:  map 100% reduce 100%
16/09/11 21:49:29 INFO mapreduce.Job: Job job_1473644272824_0001 completed successfully
16/09/11 21:49:29 INFO mapreduce.Job: Counters: 49
	File System Counters
		FILE: Number of bytes read=103
		FILE: Number of bytes written=427675
		FILE: Number of read operations=0
		FILE: Number of large read operations=0
		FILE: Number of write operations=0
		HDFS: Number of bytes read=387
		HDFS: Number of bytes written=49
		HDFS: Number of read operations=12
		HDFS: Number of large read operations=0
		HDFS: Number of write operations=2
	Job Counters
		Launched map tasks=3
		Launched reduce tasks=1
		Data-local map tasks=3
		Total time spent by all maps in occupied slots (ms)=24633
		Total time spent by all reduces in occupied slots (ms)=27722
		Total time spent by all map tasks (ms)=24633
		Total time spent by all reduce tasks (ms)=27722
		Total vcore-milliseconds taken by all map tasks=24633
		Total vcore-milliseconds taken by all reduce tasks=27722
		Total megabyte-milliseconds taken by all map tasks=25224192
		Total megabyte-milliseconds taken by all reduce tasks=28387328
	Map-Reduce Framework
		Map input records=13
		Map output records=15
		Map output bytes=107
		Map output materialized bytes=115
		Input split bytes=340
		Combine input records=15
		Combine output records=10
		Reduce input groups=9
		Reduce shuffle bytes=115
		Reduce input records=10
		Reduce output records=9
		Spilled Records=20
		Shuffled Maps =3
		Failed Shuffles=0
		Merged Map outputs=3
		GC time elapsed (ms)=684
		CPU time spent (ms)=3040
		Physical memory (bytes) snapshot=869154816
		Virtual memory (bytes) snapshot=8342061056
		Total committed heap usage (bytes)=639631360
	Shuffle Errors
		BAD_ID=0
		CONNECTION=0
		IO_ERROR=0
		WRONG_LENGTH=0
		WRONG_MAP=0
		WRONG_REDUCE=0
	File Input Format Counters
		Bytes Read=47
	File Output Format Counters
		Bytes Written=49
1.2.2.2 演示上述平均温度统计
资源链接:https://github.com/jsoftbiz/mapreduce_1
需要使用到streaming
[hadoop@NN01 temperature]$ hadoop jar /home/hadoop/hadoop2.6/share/hadoop/tools/lib/*streaming*.jar -input /temperature/input/* -output /temperature/py-output -file mapper.py -mapper mapper.py -file reducer.py -reducer reducer.py
16/08/09 22:26:30 WARN streaming.StreamJob: -file option is deprecated, please use generic option -files instead.
packageJobJar: [mapper.py, reducer.py, /tmp/hadoop-unjar8704173289988394156/] [] /tmp/streamjob6992547910816721479.jar tmpDir=null
16/08/09 22:26:32 INFO client.RMProxy: Connecting to ResourceManager at NN01.HadoopVM/192.168.71.128:8032
16/08/09 22:26:32 INFO client.RMProxy: Connecting to ResourceManager at NN01.HadoopVM/192.168.71.128:8032
16/08/09 22:26:33 INFO mapred.FileInputFormat: Total input paths to process : 1
16/08/09 22:26:33 INFO mapreduce.JobSubmitter: number of splits:2
16/08/09 22:26:33 INFO mapreduce.JobSubmitter: Submitting tokens for job: job_1470792183416_0002
16/08/09 22:26:34 INFO impl.YarnClientImpl: Submitted application application_1470792183416_0002
16/08/09 22:26:34 INFO mapreduce.Job: The url to track the job: http://NN01.HadoopVM:8088/proxy/application_1470792183416_0002/
16/08/09 22:26:34 INFO mapreduce.Job: Running job: job_1470792183416_0002
16/08/09 22:26:47 INFO mapreduce.Job: Job job_1470792183416_0002 running in uber mode : false
16/08/09 22:26:47 INFO mapreduce.Job:  map 0% reduce 0%
16/08/09 22:26:57 INFO mapreduce.Job:  map 50% reduce 0%
16/08/09 22:26:58 INFO mapreduce.Job:  map 100% reduce 0%
16/08/09 22:27:06 INFO mapreduce.Job:  map 100% reduce 100%
16/08/09 22:27:06 INFO mapreduce.Job: Job job_1470792183416_0002 completed successfully
16/08/09 22:27:06 INFO mapreduce.Job: Counters: 49
	File System Counters
		FILE: Number of bytes read=78
		FILE: Number of bytes written=330581
		FILE: Number of read operations=0
		FILE: Number of large read operations=0
		FILE: Number of write operations=0
		HDFS: Number of bytes read=407
		HDFS: Number of bytes written=18
		HDFS: Number of read operations=9
		HDFS: Number of large read operations=0
		HDFS: Number of write operations=2
	Job Counters
		Launched map tasks=2
		Launched reduce tasks=1
		Data-local map tasks=2
		Total time spent by all maps in occupied slots (ms)=16690
		Total time spent by all reduces in occupied slots (ms)=6278
		Total time spent by all map tasks (ms)=16690
		Total time spent by all reduce tasks (ms)=6278
		Total vcore-milliseconds taken by all map tasks=16690
		Total vcore-milliseconds taken by all reduce tasks=6278
		Total megabyte-milliseconds taken by all map tasks=17090560
		Total megabyte-milliseconds taken by all reduce tasks=6428672
	Map-Reduce Framework
		Map input records=9
		Map output records=9
		Map output bytes=54
		Map output materialized bytes=84
		Input split bytes=222
		Combine input records=0
		Combine output records=0
		Reduce input groups=3
		Reduce shuffle bytes=84
		Reduce input records=9
		Reduce output records=3
		Spilled Records=18
		Shuffled Maps =2
		Failed Shuffles=0
		Merged Map outputs=2
		GC time elapsed (ms)=2002
		CPU time spent (ms)=5260
		Physical memory (bytes) snapshot=685187072
		Virtual memory (bytes) snapshot=6260936704
		Total committed heap usage (bytes)=498597888
	Shuffle Errors
		BAD_ID=0
		CONNECTION=0
		IO_ERROR=0
		WRONG_LENGTH=0
		WRONG_MAP=0
		WRONG_REDUCE=0
	File Input Format Counters
		Bytes Read=185
	File Output Format Counters
		Bytes Written=18
16/08/09 22:27:06 INFO streaming.StreamJob: Output directory: /temperature/py-output
1.2.2.3 Writing an Hadoop MapReduce Program in Python
原文请参照:
Writing an Hadoop MapReduce Program in Python
[hadoop@NN01 hadoop]$ hadoop jar /home/hadoop/hadoop2.6/share/hadoop/tools/lib/*streaming*.jar -file /home/hadoop/words/mapper.py -mapper /home/hadoop/words/mapper.py -file /home/hadoop/words/reducer.py -reducer /home/hadoop/words/reducer.py -input /words/input/* -output /words/py-output
16/08/09 20:10:28 WARN streaming.StreamJob: -file option is deprecated, please use generic option -files instead.
packageJobJar: [/home/hadoop/words/mapper.py, /home/hadoop/words/reducer.py, /tmp/hadoop-unjar5100483106189698643/] [] /tmp/streamjob6336434171947928949.jar tmpDir=null
16/08/09 20:10:29 INFO client.RMProxy: Connecting to ResourceManager at NN01.HadoopVM/192.168.71.128:8032
16/08/09 20:10:29 INFO client.RMProxy: Connecting to ResourceManager at NN01.HadoopVM/192.168.71.128:8032
16/08/09 20:10:30 INFO mapred.FileInputFormat: Total input paths to process : 2
16/08/09 20:10:30 INFO mapreduce.JobSubmitter: number of splits:2
16/08/09 20:10:31 INFO mapreduce.JobSubmitter: Submitting tokens for job: job_1470792183416_0001
16/08/09 20:10:32 INFO impl.YarnClientImpl: Submitted application application_1470792183416_0001
16/08/09 20:10:32 INFO mapreduce.Job: The url to track the job: http://NN01.HadoopVM:8088/proxy/application_1470792183416_0001/
16/08/09 20:10:32 INFO mapreduce.Job: Running job: job_1470792183416_0001
16/08/09 20:10:45 INFO mapreduce.Job: Job job_1470792183416_0001 running in uber mode : false
16/08/09 20:10:45 INFO mapreduce.Job:  map 0% reduce 0%
16/08/09 20:10:59 INFO mapreduce.Job:  map 50% reduce 0%
16/08/09 20:11:03 INFO mapreduce.Job:  map 100% reduce 0%
16/08/09 20:11:05 INFO mapreduce.Job:  map 100% reduce 100%
16/08/09 20:11:06 INFO mapreduce.Job: Job job_1470792183416_0001 completed successfully
16/08/09 20:11:06 INFO mapreduce.Job: Counters: 49
	File System Counters
		FILE: Number of bytes read=47
		FILE: Number of bytes written=330444
		FILE: Number of read operations=0
		FILE: Number of large read operations=0
		FILE: Number of write operations=0
		HDFS: Number of bytes read=223
		HDFS: Number of bytes written=25
		HDFS: Number of read operations=9
		HDFS: Number of large read operations=0
		HDFS: Number of write operations=2
	Job Counters
		Launched map tasks=2
		Launched reduce tasks=1
		Data-local map tasks=2
		Total time spent by all maps in occupied slots (ms)=24400
		Total time spent by all reduces in occupied slots (ms)=3381
		Total time spent by all map tasks (ms)=24400
		Total time spent by all reduce tasks (ms)=3381
		Total vcore-milliseconds taken by all map tasks=24400
		Total vcore-milliseconds taken by all reduce tasks=3381
		Total megabyte-milliseconds taken by all map tasks=24985600
		Total megabyte-milliseconds taken by all reduce tasks=3462144
	Map-Reduce Framework
		Map input records=2
		Map output records=4
		Map output bytes=33
		Map output materialized bytes=53
		Input split bytes=198
		Combine input records=0
		Combine output records=0
		Reduce input groups=3
		Reduce shuffle bytes=53
		Reduce input records=4
		Reduce output records=3
		Spilled Records=8
		Shuffled Maps =2
		Failed Shuffles=0
		Merged Map outputs=2
		GC time elapsed (ms)=1505
		CPU time spent (ms)=6830
		Physical memory (bytes) snapshot=677711872
		Virtual memory (bytes) snapshot=6261100544
		Total committed heap usage (bytes)=482869248
	Shuffle Errors
		BAD_ID=0
		CONNECTION=0
		IO_ERROR=0
		WRONG_LENGTH=0
		WRONG_MAP=0
		WRONG_REDUCE=0
	File Input Format Counters
		Bytes Read=25
	File Output Format Counters
		Bytes Written=25
16/08/09 20:11:06 INFO streaming.StreamJob: Output directory: /words/py-output
1.2.3 MapR问题
NameNode JobTracker
- 问题:是否配置在同一节点?
- 答:JobTracker与TaskTracker 是Hadoop1.x的概念,Hadoop2.x之后被Yarn的RM与NM替代。通常情况是配置在同一节点。官方解释:
- Typically the compute nodes and the storage nodes are the same, that is, the MapReduce framework and the Hadoop Distributed File System (see HDFS Architecture Guide) are running on the same set of nodes. This configuration allows the framework to effectively schedule tasks on the nodes where data is already present, resulting in very high aggregate bandwidth across the cluster.
- The MapReduce framework consists of a single master JobTracker and one slave TaskTracker per cluster-node. The master is responsible for scheduling the jobs’ component tasks on the slaves, monitoring them and re-executing the failed tasks. The slaves execute the tasks as directed by the master.
- Minimally, applications specify the input/output locations and supply map and reduce functions via implementations of appropriate interfaces and/or abstract-classes. These, and other job parameters, comprise the job configuration. The Hadoop job client then submits the job (jar/executable etc.) and configuration to the JobTracker which then assumes the responsibility of distributing the software/configuration to the slaves, scheduling tasks and monitoring them, providing status and diagnostic information to the job-client.
RM与AM和NameNode与DataNode的关系
- 问题:以上是否可以指定分配?
- 答:可以。需要改动yarn-site.xml文件并指明ResorceManager并在需要启动ResorceManager的节点上修改相应slave及master文件配置。RM与AM的关系参见YARN.
[hadoop@DN01 sbin]$ jps
6980 NodeManager
4870 DataNode
6873 ResourceManager
[hadoop@NN01 words]$ jps
7819 DataNode
7997 SecondaryNameNode
7709 NameNode
8910 NodeManager
[hadoop@DN02 ~]$ jps
4587 DataNode
5549 NodeManager
NameNode与DataNode的关系:NameNode可以看作是分布式文件系统中的管理者,主要负责管理文件系统的命名空间、集群配置信息和存储块的复制等。NameNode会将文件系统的Meta-data存储在内存中,这些信息主要包括了文件信息、每一个文件对应的文件块的信息和每一个文件块在DataNode的信息等。DataNode是文件存储的基本单元,它将Block存储在本地文件系统中,保存了Block的Meta-data,同时周期性地将所有存在的Block信息发送给NameNode。
Map过程读数据位置
- 问题:读取文件位置
-
答:同Read过程。
- How Many Maps?
- The number of maps is usually driven by the total size of the inputs, that is, the total number of blocks of the input files.
- 默认为2
<property>
<name>mapreduce.job.maps</name>
<value>2</value>
<source>mapred-default.xml</source>
</property>
参考:
hadooop提供了一个设置map个数的参数mapred.map.tasks,我们可以通过这个参数来控制map的个数。但是通过这种方式设置map的个数,并不是每次都有效的。原因是mapred.map.tasks只是一个hadoop的参考数值,最终map的个数,还取决于其他的因素。
- 为了方便介绍,先来看几个名词:
- block_size : hdfs的文件块大小,默认为64M,可以通过参数dfs.block.size设置
- total_size : 输入文件整体的大小
- input_file_num : 输入文件的个数
(1)默认map个数 如果不进行任何设置,默认的map个数是和blcok_size相关的。 default_num = total_size / block_size;
(2)期望大小 可以通过参数mapred.map.tasks来设置程序员期望的map个数,但是这个个数只有在大于default_num的时候,才会生效。 goal_num = mapred.map.tasks;
(3)设置处理的文件大小 可以通过mapred.min.split.size 设置每个task处理的文件大小,但是这个大小只有在大于block_size的时候才会生效。 split_size = max(mapred.min.split.size, block_size); split_num = total_size / split_size;
(4)计算的map个数 compute_map_num = min(split_num, max(default_num, goal_num))
除了这些配置以外,mapreduce还要遵循一些原则。 mapreduce的每一个map处理的数据是不能跨越文件的,也就是说min_map_num >= input_file_num。 所以,最终的map个数应该为:
final_map_num = max(compute_map_num, input_file_num)
经过以上的分析,在设置map个数的时候,可以简单的总结为以下几点:
- (1)如果想增加map个数,则设置mapred.map.tasks 为一个较大的值。
- (2)如果想减小map个数,则设置mapred.min.split.size 为一个较大的值。
-
(3)如果输入中有很多小文件,依然想减少map个数,则需要将小文件merger为大文件,然后使用准则2。
- How Many Reduces?
- The right number of reduces seems to be 0.95 or 1.75 multiplied by (<no. of nodes> * <no. of maximum containers per node>).
- With 0.95 all of the reduces can launch immediately and start transferring map outputs as the maps finish. With 1.75 the faster nodes will finish their first round of reduces and launch a second wave of reduces doing a much better job of load balancing.
- Increasing the number of reduces increases the framework overhead, but increases load balancing and lowers the cost of failures.
- The scaling factors above are slightly less than whole numbers to reserve a few reduce slots in the framework for speculative-tasks and failed tasks.
- 默认为1:
<property>
<name>mapreduce.job.reduces</name>
<value>1</value>
<source>mapred-default.xml</source>
</property>
- Partitioner
- Partitioner partitions the key space.
- Partitioner controls the partitioning of the keys of the intermediate map-outputs. The key (or a subset of the key) is used to derive the partition, typically by a hash function. The total number of partitions is the same as the number of reduce tasks for the job. Hence this controls which of the m reduce tasks the intermediate key (and hence the record) is sent to for reduction.
-
HashPartitioner is the default Partitioner.
- Counter
- Counter is a facility for MapReduce applications to report its statistics.
- Mapper and Reducer implementations can use the Counter to report statistics.
1.3 Apache Hadoop YARN
1.3.1 Introduction
The fundamental idea of YARN is to split up the functionalities of resource management and job scheduling/monitoring into separate daemons. The idea is to have a global ResourceManager (RM) and per-application ApplicationMaster (AM). An application is either a single job or a DAG of jobs.
The ResourceManager and the NodeManager form the data-computation framework. The ResourceManager is the ultimate authority that arbitrates resources among all the applications in the system. The NodeManager is the per-machine framework agent who is responsible for containers, monitoring their resource usage (cpu, memory, disk, network) and reporting the same to the ResourceManager/Scheduler.
The per-application ApplicationMaster is, in effect, a framework specific library and is tasked with negotiating resources from the ResourceManager and working with the NodeManager(s) to execute and monitor the tasks**.

The ResourceManager has two main components: Scheduler and ApplicationsManager.
The Scheduler is responsible for allocating resources to the various running applications subject to familiar constraints of capacities, queues etc. The Scheduler is pure scheduler in the sense that it performs no monitoring or tracking of status for the application. Also, it offers no guarantees about restarting failed tasks either due to application failure or hardware failures. The Scheduler performs its scheduling function based the resource requirements of the applications; it does so based on the abstract notion of a resource Container which incorporates elements such as memory, cpu, disk, network etc.
The Scheduler has a pluggable policy which is responsible for partitioning the cluster resources among the various queues, applications etc. The current schedulers such as the CapacityScheduler and the FairScheduler would be some examples of plug-ins.
The ApplicationsManager is responsible for accepting job-submissions, negotiating the first container for executing the application specific ApplicationMaster and provides the service for restarting the ApplicationMaster container on failure. The per-application ApplicationMaster has the responsibility of negotiating appropriate resource containers from the Scheduler, tracking their status and monitoring for progress.
1.3.2 应用程序运行过程
- 步骤1:用户将应用程序提交到ResourceManager上;
- 步骤2:ResourceManager为应用程序ApplicationMaster申请资源,并与某个NodeManager通信,以启动ApplicationMaster;
- 步骤3:ApplicationMaster与ResourceManager通信,为内部要执行的任务申请资源,一旦得到资源后,将于NodeManager通信,以启动对应的任务。
- 步骤4:所有任务运行完成后,ApplicationMaster向ResourceManager注销,整个应用程序运行结束。

1.3.3 ResourceManager与ApplicationMaster与NodeManager

 参看:
参看:1.4 HBase
1.4.1 Introduction
Apache Hbase安装及测试
提供海量数据存储功能,是一种构建在HDFS之上的分布式、面向列的存储系统。
Browse to the Web UI
1.4.2 The Apache HBase Shell演示
- 1 Scripting with Ruby
- 2 Running the Shell in Non-Interactive Mode
- 3 HBase Shell in OS Scripts
- 4 Read HBase Shell Commands from a Command File
1.4.3 Data Model
- 1 时间戳(Timestamp):每次数据操作对应的时间戳,可以看作是数据的版本号
- 2 列族(Column Family):表在水平方向有一个或者多个列族组成,一个列族中可以由任意多个列组成,列族支持动态扩展,无需预先定义列的数量以及类型,所有列均以二进制格式存储,用户需要自行进行类型转换。所有的列族成员的前缀是相同的,例如“abc:a1”和“abc:a2”两个列都属于abc这个列族。
- 3 表和区域(Table&Region):当表随着记录数不断增加而变大后,会逐渐分裂成多份,成为区域,一个区域是对表的水平划分,不同的区域会被Master分配给相应的RegionServer进行管理
- 4 单元格(Cell):表存储数据的单元。由{行健,列(列族:标签),时间戳}唯一确定,其中的数据是没有类型的,以二进制的形式存储。
2 Service Programming
2.1 Zookeeper

ZooKeeper是Hadoop Ecosystem中非常重要的组件,它的主要功能是为分布式系统提供一致性协调(Coordination)服务,与之对应的Google的类似服务叫Chubby。
2.1.1 Zookeeper的基本概念
- 1 Role
Zookeeper中的角色主要有以下三类,如下表所示:
 系统模型如图所示:

-
2 Target
- 1 最终一致性:client不论连接到哪个Server,展示给它都是同一个视图,这是zookeeper最重要的性能。
- 2 可靠性:具有简单、健壮、良好的性能,如果消息m被到一台服务器接受,那么它将被所有的服务器接受。
- 3 实时性:Zookeeper保证客户端将在一个时间间隔范围内获得服务器的更新信息,或者服务器失效的信息。但由于网络延时等原因,Zookeeper不能保证两个客户端能同时得到刚更新的数据,如果需要最新数据,应该在读数据之前调用sync()接口。*
- 4 等待无关(wait-free):慢的或者失效的client不得干预快速的client的请求,使得每个client都能有效的等待。
- 5 原子性:更新只能成功或者失败,没有中间状态。
- 6 顺序性:包括全局有序和偏序两种:全局有序是指如果在一台服务器上消息a在消息b前发布,则在所有Server上消息a都将在消息b前被发布;偏序是指如果一个消息b在消息a后被同一个发送者发布,a必将排在b前面。
2.1.2 ZooKeeper的工作原理
Zookeeper的核心是原子广播,这个机制保证了各个Server之间的同步。实现这个机制的协议叫做Zab协议。Zab协议有两种模式,它们分别是恢复模式(选主)和广播模式(同步)。当服务启动或者在领导者崩溃后,Zab就进入了恢复模式,当领导者被选举出来,且大多数Server完成了和leader的状态同步以后,恢复模式就结束了。状态同步保证了leader和Server具有相同的系统状态。
为了保证事务的顺序一致性,zookeeper采用了递增的事务id号(zxid)来标识事务。所有的提议(proposal)都在被提出的时候加上了zxid。实现中zxid是一个64位的数字,它高32位是epoch用来标识leader关系是否改变,每次一个leader被选出来,它都会有一个新的epoch,标识当前属于那个leader的统治时期。低32位用于递增计数。
每个Server在工作过程中有三种状态:
- 1 LOOKING:当前Server不知道leader是谁,正在搜寻
- 2 LEADING:当前Server即为选举出来的leader
- 3 FOLLOWING:leader已经选举出来,当前Server与之同步
可以参照此博客详细过程
2.2 kafka
一个分布式的、分区的、多副本的实时消息发布和订阅系统。提供可扩展、高吞吐、低延迟、高可靠的消息分发服务。
视频教程http://www.jikexueyuan.com/course/kafka/
2.2.1 Introduction

Kafka is a distributed,partitioned,replicated commit logservice。它提供了类似于JMS的特性,但是在设计实现上完全不同,此外它并不是JMS规范的实现。kafka对消息保存时根据Topic进行归类,发送消息者成为Producer,消息接受者成为Consumer,此外kafka集群有多个kafka实例组成,每个实例(server)成为broker。无论是kafka集群,还是producer和consumer都依赖于zookeeper来保证系统可用性集群保存一些meta信息。

2.2.2 集群实现与演示
[hadoop@NN01 ~]$ ~/tools/runRemoteCmd.sh "/home/hadoop/kafka/bin/kafka-server-start.sh $KAFKA_HOME/config/server.properties &" all

[hadoop@DN02 bin]$ $KAFKA_HOME/bin/kafka-console-producer.sh --broker-list NN01.HadoopVM:9092 --sync --topic test

[hadoop@DN01 bin]$ $KAFKA_HOME/bin/kafka-console-consumer.sh --zookeeper NN01.HadoopVM:2181 --topic test --from-beginning
3 Distributed Programming
3.1 Pig
pig是hadoop上层的衍生架构,与hive类似。对比hive(hive类似sql,是一种声明式的语言),pig是一种过程语言,类似于存储过程一步一步得进行数据转化。
3.1.1 pig数据类型
-
double float long int bytearray -
tuple bag map chararray bytearray
- double float long int chararray bytearray都相当于pig的基本类型
- tuple相当于数组 ,但是可以类型不一,举例(‘dirkzhang’,’dallas’,41)
- Bag相当于tuple的一个集合,举例{(‘dirk’,41),(‘kedde’,2),(‘terre’,31)},在group的时候会生成bag
- Map相当于哈希表,key为chararray,value为任意类型,例如[‘name’#dirk,’age’#36,’num’#41
- nulls 表示的不只是数据不存在,他更表示数据是unkown
3.1.2 pig基本语法
TODO
3.2 Hive
3.2.1 Hive introduction
建立在Hadoop基础上的开源的数据仓库,提供类似SQL的Hive QL语言操作结构化数据存储服务和基本的数据分析服务。
hive修改默认元数据存储数据库derby改为mysql
sudo yum install mysql
mysql -uroot -p //[密码修改](http://blog.csdn.net/leili0806/article/details/8573636)
CREATE USER 'hive' IDENTIFIED BY '*******';
# SET PASSWORD FOR 'username'@'host' = PASSWORD('newpassword');
update user set password=password('*******') where user='root';
flush privileges;
GRANT ALL PRIVILEGES ON *.* TO 'hive'@'%' WITH GRANT OPTION;
mysql -uhive -pmysql//以hive用户进入mysql
create database hive;
# 将mysql的jdbc驱动放置到hive的lib目录下

wget http://dev.mysql.com/get/Downloads/Connector-J/mysql-connector-java-5.1.39.tar.gz/from/http://mysql.he.net/
tar -xvzf mysql-connector-java-5.1.39.tar.gz
cp mysql-connector-java-5.1.39/*.jar $HIVE_HOME/lib
配置hive-site.xml
<configuration>
    <property>
        <name>hive.metastore.local</name>
        <value>true</value>
    </property>
    <property>
        <name>javax.jdo.option.ConnectionURL</name>
        <value>jdbc:mysql://192.168.11.157:3306/hive?characterEncoding=UTF-8</value>
    </property>
    <property>
        <name>javax.jdo.option.ConnectionDriverName</name>
        <value>com.mysql.jdbc.Driver</value>
    </property>
    <property>
        <name>javax.jdo.option.ConnectionUserName</name>
        <value>hive</value>
    </property>
    <property>
        <name>javax.jdo.option.ConnectionPassword</name>
        <value>******</value>
    </property>
</configuration>
- 1.hive允许远程客户端使用哪些编程语言?
- 2.已经存在HiveServer为什么还需要HiveServer2?
- 3.HiveServer2有哪些优点?
- 4.hive.server2.thrift.min.worker.threads-最小工作线程数,默认为多少?
- 5.启动Hiveserver2有哪两种方式?
之前的学习和实践Hive中,使用的都是CLI或者hive –e的方式,该方式仅允许使用HiveQL执行查询、更新等操作,并且该方式比较笨拙单一。幸好Hive提供了轻客户端的实现,通过HiveServer或者HiveServer2,客户端可以在不启动CLI的情况下对Hive中的数据进行操作,两者都允许远程客户端使用多种编程语言如Java、Python向Hive提交请求,取回结果。HiveServer或者HiveServer2都是基于Thrift的,但HiveSever有时被称为Thrift server,而HiveServer2却不会。既然已经存在HiveServer为什么还需要HiveServer2呢?这是因为HiveServer不能处理多于一个客户端的并发请求,这是由于HiveServer使用的Thrift接口所导致的限制,不能通过修改HiveServer的代码修正。因此在Hive-0.11.0版本中重写了HiveServer代码得到了HiveServer2,进而解决了该问题。HiveServer2支持多客户端的并发和认证,为开放API客户端如JDBC、ODBC提供了更好的支持。
既然HiveServer2提供了更强大的功能,将会对其进行着重学习,但也会简单了解一下HiveServer的使用方法。在命令中输入hive –service help,结果如下。从结果可以了解到,可以使用hive
配置hiveserver2,修改hive-site.xml
Configuration Properties in the hive-site.xml File
hive.server2.thrift.min.worker.threads – Minimum number of worker threads, default 5.
hive.server2.thrift.max.worker.threads – Maximum number of worker threads, default 500.
hive.server2.thrift.port – TCP port number to listen on, default 10000.
hive.server2.thrift.bind.host – TCP interface to bind to.
关于 HIVE Beeline 问题
1 启动 hiveserver2 服务,启动 beeline -u jdbc:hive2:// 正常 ,启动 beeline -u jdbc:hive2://127.0.0.1:10000 包如下错误
Error: Failed to open new session: java.lang.RuntimeException: org.apache.hadoop.ipc.RemoteException(org.apache.hadoop.security.authorize.AuthorizationException): User: root is not allowed to impersonate anonymous (state=,code=0) Beeline version 2.1.0 by Apache Hive
分析 : 访问权限问题
解决 :在hdfs 的配置文件core-site.xml中加入如下配置,root 为位置填入 User:* ,etc hadoop.proxyuser.eamon.hosts
<property>
  <name>hadoop.proxyuser.root.hosts</name>
  <value>*</value>
 </property>
 <property>
  <name>hadoop.proxyuser.root.groups</name>
  <value>*</value>
</property>
重新启动HDFS 。
2 执行 beeline -u jdbc:hive2://127.0.0.1:10000 ,报如下错误
Error: Failed to open new session: java.lang.RuntimeException: org.apache.hadoop.security.AccessControlException: Permission denied: user=anonymous, access=EXECUTE, inode=”/tmp/hive”:root:supergroup:drwx——
分析 : HDFS 文件系统权限问题
解决 : 临时解决
bin/hdfs dfs -chmod -R 777 /tmp/
3.2.2 Running Hive
	# Starting from Hive 2.1, we need to run the schematool command below as an initialization step. For example, we can use "derby" as db type.
	$HIVE_HOME/bin/schematool -dbType <db type> -initSchema
1 hive 连接测试
hive> CREATE TABLE bank(
    > age int,
    > job string,
    > marital string,
    > education string,
    > default string,
    > balance int,
    > housing string,
    > loan string,
    > contact string,
    > day int,
    > month string,
    > duration int,
    > campaign int,
    > pdays int,
    > previous int,
    > poutcome string,
    > y string)
    > ROW FORMAT delimited fields terminated by ',';
OK
Time taken: 2.648 seconds
hive> show tables;
OK
bank
Time taken: 0.074 seconds, Fetched: 1 row(s)
hive> desc bank;
OK
age                 	int
job                 	string
marital             	string
education           	string
default             	string
balance             	int
housing             	string
loan                	string
contact             	string
day                 	int
month               	string
duration            	int
campaign            	int
pdays               	int
previous            	int
poutcome            	string
y                   	string
Time taken: 0.324 seconds, Fetched: 17 row(s)
hive> load data local inpath "/home/hadoop/bank-full.csv" overwrite into table bank;
Loading data to table default.bank
OK
Time taken: 2.019 seconds
2 beeline 连接测试
beeline> !connect jdbc:hive2://localhost:10000 hive ******
Connecting to jdbc:hive2://localhost:10000
Connected to: Apache Hive (version 2.1.0)
Driver: Hive JDBC (version 2.1.0)
16/09/22 19:32:52 [main]: WARN jdbc.HiveConnection: Request to set autoCommit to false; Hive does not support autoCommit=false.
Transaction isolation: TRANSACTION_REPEATABLE_READ
0: jdbc:hive2://localhost:10000> show databases;
+----------------+--+
| database_name  |
+----------------+--+
| default        |
+----------------+--+
1 row selected (5.569 seconds)
0: jdbc:hive2://localhost:10000> show tables;
+-----------+--+
| tab_name  |
+-----------+--+
| bank      |
| test      |
+-----------+--+
2 rows selected (0.32 seconds)
0: jdbc:hive2://localhost:10000> select count(*) from test;
WARNING: Hive-on-MR is deprecated in Hive 2 and may not be available in the future versions. Consider using a different execution engine (i.e. spark, tez) or using Hive 1.X releases.
+--------+--+
|   c0   |
+--------+--+
| 45211  |
+--------+--+
1 row selected (203.928 seconds)
0: jdbc:hive2://localhost:10000>
3 python 连接hive
wget --no-check-certificate https://pypi.python.org/packages/source/p/pip/pip-1.4.1.tar.gz
tar zxvf pip-1.4.1.tar.gz
cd pip-1.4.1
python setup.py install
安装依赖包
sudo yum install gcc-c++ python-devel.x86_64 cyrus-sasl-devel.x86_64
sudo pip install pyhs2
python 连接测试
[hadoop@DN02 ~]$ python

>>> import pyhs2
>>> conn = pyhs2.connect(host="NN01.HadoopVM",user='hive',password='hive',authMechanism='PLAIN')
>>> cur = conn.cursor()
>>> # Show databases
>>> cur.getDatabases()
[['default', '']]
>>> # Execute query
>>> cur.execute("select * from bank limit 10")
>>> # Return column info from query
>>> print cur.getSchema()
[{'comment': None, 'columnName': 'bank.age', 'type': 'INT_TYPE'},... {'comment': None, 'columnName': 'bank.y', 'type': 'STRING_TYPE'}]
>>> # Fetch table results
>>> for i in cur.fetch():
...     print i
...
[58, 'management', 'married', 'tertiary', 'no', 2143, 'yes', 'no', 'unknown', 5, 'may', 261, 1, -1, 0, 'unknown', 'no']
...
windows连接报错
 conn = pyhs2.connect(host="192.168.71.128", user='hive', password='hive', authMechanism='PLAIN')
Traceback (most recent call last):
  File "C:\Anaconda2\lib\site-packages\IPython\core\interactiveshell.py", line 2885, in run_code
    exec(code_obj, self.user_global_ns, self.user_ns)
  File "<ipython-input-5-04457594e509>", line 1, in <module>
    conn = pyhs2.connect(host="192.168.71.128", user='hive', password='hive', authMechanism='PLAIN')
  File "C:\Anaconda2\lib\site-packages\pyhs2\__init__.py", line 7, in connect
    return Connection(*args, **kwargs)
  File "C:\Anaconda2\lib\site-packages\pyhs2\connections.py", line 46, in __init__
    transport.open()
  File "C:\Anaconda2\lib\site-packages\pyhs2\cloudera\thrift_sasl.py", line 66, in open
    message=("Could not start SASL: %s" % self.sasl.getError()))
1 In hive-site.xml, set configuration as below:
<property>
   <name>hive.server2.authentication</name>
   <value>NOSASL</value>
</property>
2 Test again
In[6]: import pyhs2
In[7]: conn = pyhs2.connect(host="192.168.71.128", user='hive', password='hive', authMechanism='NOSASL')
In[8]: cur= conn.cursor()
In[9]: cur.execute("show databases")
In[10]: cur.fetch()
Out[10]: [['default']]
In[11]: cur.execute("show tables")
In[12]: cur.fetch()
Out[12]: [['bank'], ['david_test'], ['test']]
4 连接客户端查看:

5 hive 命令的调用方式
1) script
[hadoop@NN01 hivetest]$ cat hive_script3.sql
select * from bank limit 10;
select count(*) from bank;
[hadoop@NN01 hivetest]$ hive -S -f hive_script3.sql
...
58	management	married	tertiary	n2143	yes	no	unknown	5	may	261	1	-1	0	unknown	no
......
43	technician	single	secondary	n593	yes	no	unknown	5	may	5-1	0	unknown	no
45211
# create table
>>> conn = pyhs2.connect(host="NN01.HadoopVM", user="hive",password = 'hive', authMechanism='PLAIN')>>> cur = conn.cursor()
>>> cur.execute("create table david_test(id int, name string)")
>>> cur.execute("desc david_test")
>>> ll = cur.fetch()
>>> ll
[['id', 'int', ''], ['name', 'string', '']]
>>> cur.execute("insert into david_test(id,name) values (1,'David'),(2, 'Alice')")
>>> cur.execute("select * from david_test")
>>> fetch = cur.fetch()
>>> fetch
[[1, 'David'], [2, 'Alice']]

# shell fetch
[hadoop@NN01 hivetest]$ ./start_hql.sh 2
2	Alice
[hadoop@NN01 hivetest]$ cat start_hql.sh
hive\
	-hivevar id=$1\
	-hivevar name=$2\
	-S -f hql.sql
[hadoop@NN01 hivetest]$ cat hql.sql
--databases
use default;
--tables
select * from david_test
where id='${hivevar:id}' ;
2) 命令行模式
[hadoop@NN01 hivetest]$ hive -e "select count(*) from bank"
......
OK
45211
Time taken: 36.675 seconds, Fetched: 1 row(s)
3.3.3 Hive 相关问题
- 问题:HIve只是对MapR的一个翻译?
-
答:是的。参看Hive原理及查询优化
- 问题:HIve有没有图形化界面客户端
- 答:Hive目前有以下客户端:
- Command Line
- JDBC
- Python
- PHP
- ODBC
- Thrift
- Thrift Java Client
- Thrift C++ Client
- Thrift Node Clients
- Thrift Ruby Client
3.3 Spark
基于内存进行计算的分布式计算框架。
3.3.1 Spark Overview
Apache Spark is a fast and general-purpose cluster computing system. It provides high-level APIs in Java, Scala, Python and R, and an optimized engine that supports general execution graphs. It also supports a rich set of higher-level tools including Spark SQL for SQL and structured data processing, MLlib for machine learning, GraphX for graph processing, and Spark Streaming.
Spark的适用场景
Spark是基于内存的迭代计算框架,适用于需要多次操作特定数据集的应用场合。需要反复操作的次数越多,所需读取的数据量越大,受益越大,数据量小但是计算密集度较大的场合,受益就相对较小 由于RDD的特性,Spark不适用那种异步细粒度更新状态的应用,例如web服务的存储或者是增量的web爬虫和索引。就是对于那种增量修改的应用模型不适合。 总的来说Spark的适用面比较广泛且比较通用。
Key terms used in Apache Spark:
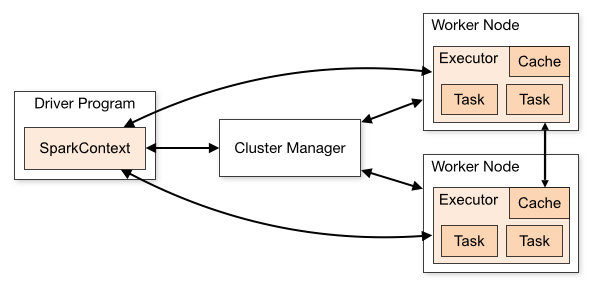 Image source:https://spark.apache.org/docs/2.0.0/img/cluster-overview.png
Spark Context: It holds a connection with Spark cluster manager. All Spark applications run as independent set of processes, coordinated by a SparkContext in a program.
Driver and Worker: A driver is incharge of the process of running the main() function of an application and creating the SparkContext. A worker, on the other hand, is any node that can run program in the cluster. If a process is launched for an application, then this application acquires executors at worker node.
Cluster Manager: Cluster manager allocates resources to each application in driver program. There are three types of cluster managers supported by Apache Spark – Standalone, Mesos and YARN. Apache Spark is agnostic to the underlying cluster manager, so we can install any cluster manager, each has its own unique advantages depending upon the goal. They all are different in terms of scheduling, security and monitoring. Once SparkContext connects to the cluster manager, it acquires executors on a cluster node, these executors are worker nodes on cluster which work independently on each tasks and interact with each other.
Cluster Manager Types
The system currently supports three cluster managers:
- *1 Standalone – a simple cluster manager included with Spark that makes it easy to set up a cluster.
- *2 Apache Mesos – a general cluster manager that can also run Hadoop MapReduce and service applications.
- *3 Hadoop YARN – the resource manager in Hadoop 2.
How Apache Spark is better than traditional big data framework?
Language Support: Apache Spark has API support for popular data science languages like Python, R, Scala and Java.
Supports Real time and Batch processing: Apache Spark supports “Batch data” processing where a group of transactions is collected over a period of time. It also supports real time data processing, where data is continuously flowing from the source. For example, weather information coming in from sensors can be processed by Apache Spark directly.
Lazy operation: Lazy operations are used to optimize solutions in Apache Spark. I will discuss about lazy evaluation in later part of this article. For now, we can think that there are some operations which do not execute until we require results.
Support for multiple transformations and actions: Another advantage of Apache Spark over Hadoop is that Hadoop supports only MapReduce but Apache Spark support many transformations and actions including MapReduce.
There are further advantages of Apache Spark in comparison to Hadoop. For example, Apache Spark is much faster while doing Map side shuffling and Reduce side shuffling. However, shuffling is a complex topic in itself and requires an entire article in itself. Hence, I am not talking about it in more details here.
一句话实现MapReduce
sc.textFile("README.md").flatMap(lambda line: line.split()).map(lambda word: (word, 1)).reduceByKey(lambda a, b: a+b).collect()
textFile.map(lambda line: len(line.split())).reduce(lambda a, b: a if (a > b) else b)
...
textFile.map(lambda line: len(line.split())).reduce(max)
sc.textFile("README.md").flatMap(line => line.split(" ")).map(word => (word,1)).reduceByKey(_ + _).collect()
textFile.map(line => line.split(" ").size).reduce((a, b) => if (a > b) a else b)
import java.lang.Math
textFile.map(line => line.split(" ").length).reduce((a,b) => Math.max(a,b))
[hadoop@NN01 sparkapp]$ spark-submit --master spark://NN01.HadoopVm:7077 SimpleApp.py
/home/hadoop/spark/python/lib/pyspark.zip/pyspark/sql/context.py:477: DeprecationWarning: HiveContext is deprecated in Spark 2.0.0. Please use SparkSession.builder.enableHiveSupport().getOrCreate() instead.
/home/hadoop/spark/python/lib/pyspark.zip/pyspark/sql/context.py:477: DeprecationWarning: HiveContext is deprecated in Spark 2.0.0. Please use SparkSession.builder.enableHiveSupport().getOrCreate() instead.
Lines with a: 4, lines with b: 2

[hadoop@NN01 sparkapp]$ spark-submit --class "SimpleApp" ~/sparkapp/target/scala-2.11/simple-project_2.11-1.0.jar 2>&1|grep "Line"
Lines with a: 4, Lines with b: 2
Spark 计算 Pi
using a Monte Carlo method to estimate the value of Pi
在终端中执行如下命令创建一个文件夹 pi 作为应用程序根目录
[hadoop@NN01 ~]$ cd ~
[hadoop@NN01 ~]$ mkdir ./pi
[hadoop@NN01 ~]$ mkdir -p ./pi/src/main/scala
Scala脚本
# [hadoop@NN01 ~]$ vim pi/src/main/scala/Pi.scala
import scala.math.random
import org.apache.spark._

/** Computes an approximation to Pi */

object SparkPi{
    def main(args: Array[String]) {
        val conf = new SparkConf().setAppName("Spark Pi")
        val spark = new SparkContext(conf)

        val slices = if(args.length >0) args(0).toInt else 2
        val n = 100000 * slices

        val count = spark.parallelize(1 to n, slices).map{i =>
            val x = random * 2 - 1
            val y = random * 2 - 1
            if (x * x + y * y < 1) 1 else 0
        }.reduce(_ + _)

        println("Pi is roughly: " + 4.0 * count / n)
        spark.stop()
    }
}
Link sbt with spark
# [hadoop@NN01 ~]$ vim pi/pi.sbt
name := "Spark Pi"

version := "1.0"

scalaVersion := "2.11.8"

libraryDependencies += "org.apache.spark" %% "spark-core" % "2.0.0"
查看目录并打包
[hadoop@NN01 ~]$ sbt sbt-version
Java HotSpot(TM) 64-Bit Server VM warning: ignoring option MaxPermSize=256M; support was removed in 8.0
[info] Set current project to hadoop (in build file:/home/hadoop/)
[info] 0.13.12
[hadoop@NN01 ~]$ cd pi
[hadoop@NN01 pi]$ find .
.
./pi.sbt
./src
./src/main
./src/main/scala
./src/main/scala/Pi.scala
[hadoop@NN01 pi]$ sbt package
Java HotSpot(TM) 64-Bit Server VM warning: ignoring option MaxPermSize=256M; support was removed in 8.0
[info] Set current project to Spark Pi (in build file:/home/hadoop/pi/)
[info] Updating {file:/home/hadoop/pi/}pi...
[info] Resolving jline#jline;2.12.1 ...
[info] Done updating.
[info] Compiling 1 Scala source to /home/hadoop/pi/target/scala-2.11/classes...
[info] Packaging /home/hadoop/pi/target/scala-2.11/spark-pi_2.11-1.0.jar ...
[info] Done packaging.
[success] Total time: 19 s, completed Sep 10, 2016 1:50:51 AM
[hadoop@NN01 pi]$ ls
pi.sbt  project  src  target
提交,我们就可以将生成的 jar 包通过 spark-submit 提交到 Spark 中运行了,命令如下:
[hadoop@NN01 pi]$ spark-submit --class "SparkPi" ~/pi/target/scala-2.11/spark-pi_2.11-1.0.jar
Pi is roughly: 3.13858

Caching
Spark also supports pulling data sets into a cluster-wide in-memory cache. This is very useful when data is accessed repeatedly, such as when querying a small “hot” dataset or when running an iterative algorithm like PageRank. As a simple example, let’s mark our linesWithSpark dataset to be cached:
linesWithSpark.cache()
Apache Spark data representations: RDD / Dataframe / Dataset
Spark has three data representations viz RDD, Dataframe, Dataset. For each data representation, Spark has a different API. For example, later in this article I am going to use ml (a library), which currently supports only Dataframe API. Dataframe is much faster than RDD because it has metadata (some information about data) associated with it, which allows Spark to optimize query plan. Refer to this link to know more about optimization. The Dataframe feature in Apache Spark was added in Spark 1.3. If you want to know more in depth about when to use RDD, Dataframe and Dataset you can refer this link.
In this article, I will first spend some time on RDD, to get you started with Apache Spark. Later, I will spend some time on Dataframes. Dataframes share some common characteristics with RDD (transformations and actions). In this article, I am not going to talk about Dataset as this functionality is not included in PySpark.?
RDD:
After installing and configuring PySpark, we can start programming using Spark in Python. But to use Spark functionality, we must use RDD. RDD (Resilient Distributed Database) is a collection of elements, that can be divided across multiple nodes in a cluster to run parallel processing. It is also fault tolerant collection of elements, which means it can automatically recover from failures. RDD is immutable, we can create RDD once but can’t change it. We can apply any number of operation on it and can create another RDD by applying some transformations. Here are a few things to keep in mind about RDD:
- Transformation: Transformation refers to the operation applied on a RDD to create new RDD.
- Action: Actions refer to an operation which also apply on RDD that perform computation and send the result back to driver.
RDDs use Shared Variable:
The parallel operations in Apache Spark use shared variable. It means that whenever a task is sent by a driver to executors program in a cluster, a copy of shared variable is sent to each node in a cluster, so that they can use this variable while performing task. Accumulator and Broadcast are the two types of shared variables supported by Apache Spark.
- Broadcast: We can use the Broadcast variable to save the copy of data across all node.
- Accumulator: In Accumulator variables are used for aggregating the information.
How to Create RDD in Apache Spark
Existing storage: When we want to create a RDD though existing storage in driver program (which we would like to be parallelized). For example, converting a list to RDD, which is already created in a driver program.
External sources: When we want to create a RDD though external sources such as a shared file system, HDFS, HBase, or any data source offering a Hadoop Input Format.
Writing first program in Apache Spark
I have already discussed that RDD supports two type of operations, which are transformation and action. Let us get down to writing our first program:
Step1: Create SparkContext
First step in any Apache programming is to create a SparkContext. SparkContext is needed when we want to execute operations in a cluster. SparkContext tells Spark how and where to access a cluster. It is first step to connect with Apache Cluster. If you are using Spark Shell, we will find that this is already created. Otherwise, we can create the Spark Context by importing, initializing and providing the configuration settings. For example:
 from pyspark import SparkContext
 sc = SparkContext()
Step2: Create a RDD
I have already discussed that we can create RDD in two ways: Either from an existing storage or from an external storage. Let’s create our first RDD. SparkContext has parallelize method, which is used for creating the Spark RDD from an iterable (like list, tuple..) already present in driver program.
We can also provide the number of partitions as a parameter to parallelize method. If we do not give number of partition parameter, then Spark will automatically set the number of partition in a cluster. The number of partition can be set manually by passing second parameter to parallelize method. For example, sc.parallelize(data, 10)), where data is an existing data in driver program and 10 is the number of partitions. Lets create the first Spark RDD called rdd.
data = range(1,1000)
rdd = sc.parallelize(data)
We have a collect method to see the content of RDD.
rdd.collect()
To see the first n element of a RDD we have a method take:
rdd.take(2) # It will print first 2 elements of rdd
Step 3: Map transformation.
Map transformation returns a Mapped RDD by applying function to each element of the base RDD. Let’s repeat the first step of creating a RDD from existing source, For example,
data = ['Hello' , 'I' , 'AM', 'Ankit ', 'Gupta']
Rdd = sc.parallelize(data)
Now a RDD (name is ‘Rdd’) is created from the existing source, which is a list of string in a driver program. We will now apply lambda function to each element of Rdd and return the mapped (transformed) RDD (word,1) pair in the Rdd1.
Rdd1 = Rdd.map(lambda x: (x,1))
Let’s see the out of this map operation.
Rdd1.collect()
output: [('Hello', 1), ('I', 1), ('AM', 1), ('Ankit ', 1), ('Gupta', 1)]
If you noticed, nothing happened after applying the lambda function on Rdd1 (we won’t see any computation happening in a cluster). This is called the lazy operation. All transformation operations in Spark are lazy, which means that we will not see any computations on RDD, until we need them for further action.
Spark remembers which transformation is applied to which RDD with the help of DAG (Directed a Cyclic Graph). The lazy evaluation helps Spark to optimize the solution because Spark will get time to see the DAG before actually executing the operations on RDD. This enables Spark to run operations more efficiently.
In the code above, collect() and take() are the examples of an action.
ref: Spark快速入门指南 – Spark安装与基础使用
3.3.2 Spark SQL, DataFrames and Datasets Guiderefer
TODO
3.3.3 Spark Streaming Programming Guiderefer
TODO
3.3.4 Machine Learning Library (MLlib) Guiderefer
TODO
3.3.5 GraphX Programming Guiderefer
TODO
4 Machine Learning
4.1 Mahout
5 Data Ingestion
5.1 Storm

5.1.1 Setting up a Storm Cluster
5.1.2 Storm Index
5.1.3 Storm Resources for reference
Talks and Slideshows __ Apache Storm 的历史及经验教训
5.1.4 Storm命名方式
- Storm暴风雨:其组件大多也以气象名词命名
- spout龙卷:形象的理解是把原始数据卷进Storm流式计算中
- bolt雷电:从spout或者其他bolt中接收数据进行处理或者输出
- nimbus雨云:主控节点,存在单点问题,不过可以用watchdog来保证其可用性,fast-fail后马上就启动
- topology拓扑:Storm的任务单元,形象的理解拓扑的点是spout或者bolt,之间的数据流是线,整个构成一个拓扑
5.2 Sqoop
TODO
6 Databases
6.1 Redis
6.1.1 集群安装
redis 3.0 cluster 集群 学习之路篇 [1]
[hadoop@DN01 init.d]$ sudo cp ~/redis-3.2.3/utils/redis_init_script redis
[hadoop@DN01 init.d]$ sudo chmod +x redis
[hadoop@DN01 init.d]$ cd ..
[hadoop@DN01 etc]$ sudo mkdir redis
[hadoop@DN01 etc]$ sudo cp ~/redis-3.2.3/redis.conf redis/6379.conf
官方:
start:
$ ./src/redis-server redis.conf
close:
$ ./src/redis-cli -n 6379 shutdown
安装python的redis模块
wget --no-check-certificate https://pypi.python.org/packages/source/r/redis/redis-2.8.0.tar.gz
tar -zvxf redis-2.8.0.tar.gz
mv redis-2.8.0 python-redis-2.8.0
cd python-redis-2.8.0
python setup.py install
部署成功,写段代码验证一下
import redis
client =  redis.StrictRedis(host='localhost', port=6379)
print client.ping()
True
7 System Deployment
7.1 Ambari
TODO
